You know the feeling. Your team starts in a familiar shape, the first pass goes into midfield, and suddenly the centre of the pitch belongs to someone else. Your pivot is pressed from behind, your central midfielders are receiving square, and every regain turns into another broken attack or another transition to defend. Coaches usually read that as an execution problem. Often it’s a structural one.
The 4 4 2 diamond formation remains one of football’s clearest structural answers to that problem. It narrows the team on purpose, overloads the middle on purpose, and asks opponents a difficult question: can you stop combinations through the centre without opening the outside lane? That trade is why the shape keeps returning whenever teams want more control against central-heavy systems.
What makes the diamond interesting today isn’t nostalgia. It’s relevance. Against sides that build with three midfielders, or press with a compact front line, the diamond can still create the kind of central access coaches spend whole weeks trying to manufacture through smaller positional tweaks. Used well, it doesn’t just fill the midfield. It changes the logic of the game.
Table of Contents
- Introduction Unlocking the Midfield with the Diamond
- Core Anatomy of the 4-4-2 Diamond
- Strengths and Vulnerabilities Unpacked
- Tactics in Possession and Building Attacks
- Defensive Organization and Managing Transitions
- Coaching the Diamond Drills and Progressions
- Modern Interpretations and Tactical Counters
- Conclusion The Enduring Relevance of the Diamond
Introduction Unlocking the Midfield with the Diamond
The diamond isn’t just a shape on a team sheet. It’s a way of deciding where a match will be played. Teams that choose it are saying they want more bodies around the ball, more access between opposition lines, and more control of the central corridor where possession turns into penetration.
That logic has deep roots. Tactical analysis from Coaches' Voice notes that the 4-4-2 diamond, also written as 4-1-2-1-2 or 4-3-1-2, emerged in the 1970s as an evolution between the old 4-4-2 and the rising influence of the 4-3-3, giving teams numerical superiority in central midfield and often producing a 4v2 or 4v3 advantage against opponents using two or three central midfielders in shapes such as the 4-3-3 or 4-2-3-1 (Coaches' Voice analysis of the 4-4-2 diamond).
That historical note matters because the modern game has circled back to the same question. How do you dominate the middle without losing your attacking threat? The diamond’s answer is simple but demanding. Place four midfielders on different vertical lines, keep two forwards high enough to threaten centre-backs, and trust your full-backs and rotations to solve width.
Practical rule: If your side keeps losing the ball in crowded central spaces, the problem may be your spacing between players, not the players themselves.
For coaches and informed fans, the essential value of the 4 4 2 diamond formation is that every role has a clear tactical consequence. The six protects and connects. The eights stretch the diamond vertically. The ten turns possession into access. The strikers distort the back line. The full-backs make the shape playable.
Core Anatomy of the 4-4-2 Diamond
The shape is a staggered midfield, not a flat four
At first glance, the diamond looks like a 4-4-2 with the wide midfielders moved inside. That reading misses the point. A flat four moves laterally. A diamond creates height differences between players, and those differences are what generate cleaner passing lanes.

The base of the shape is the number 6. This player acts as the screen in front of the centre-backs and the first central outlet in build-up. When the defenders split, the six gives the team a stable interior pass and protects against immediate central transition if possession is lost. In a good diamond, the six doesn’t just recycle. He sets the rhythm and decides when the team can play forward safely.
Ahead of him sit the two number 8s. They’re the engines of the system, but that phrase is too vague on its own. Their real job is to solve the next problem after the six receives. If the opposition presses centrally, the eights provide diagonal support. If the full-back goes high, the near-side eight can balance underneath. If the ten is marked, one eight can break beyond the strikers’ line to become the free runner.
The top point is the number 10, the player who turns the diamond from a circulation structure into an attacking one. This role matters because the shape’s narrowness only becomes dangerous when someone can receive in congestion, protect the ball, and connect quickly around the corner.
A useful comparison is the 4-2-3-1 structure in modern football. Both systems can occupy central zones well, but the diamond does it through vertical staggering rather than a double pivot plus line of three. That makes it more naturally layered, and sometimes more fragile if the distances aren’t coached properly.
Why the front two and full-backs matter so much
The front two are not decorative. They shape the whole attack. One striker can pin the centre-backs, while the other drops into the space just beneath them. That movement changes the opposition’s reference points. If a centre-back follows, space opens behind. If nobody follows, the dropping striker can bounce play into the ten or an advancing eight.
The full-backs complete the system because the midfield doesn’t hold touchline width by default. Without active full-backs, the diamond becomes too easy to compact against. Their timing has to match the central circulation. Go too early and the pass is telegraphed. Go too late and the attack stays trapped inside.
The cleanest way to read the shape is this:
| Unit | Main function | Tactical effect |
|---|---|---|
| Number 6 | Screen and pivot | Secures central rest defence and first progression |
| Two number 8s | Link and shuttle | Connect phases, support flanks, attack channels |
| Number 10 | Receive and create | Links midfield to strikers in tight central spaces |
| Front two | Pin and combine | Disturb centre-backs, create depth and lay-offs |
| Full-backs | Supply width | Stretch the pitch that the midfield intentionally narrows |
The diamond works when each line solves the next player’s problem before the pass arrives.
Strengths and Vulnerabilities Unpacked
The diamond’s appeal starts with one thing. It gives coaches a direct way to overload the most valuable part of the pitch.
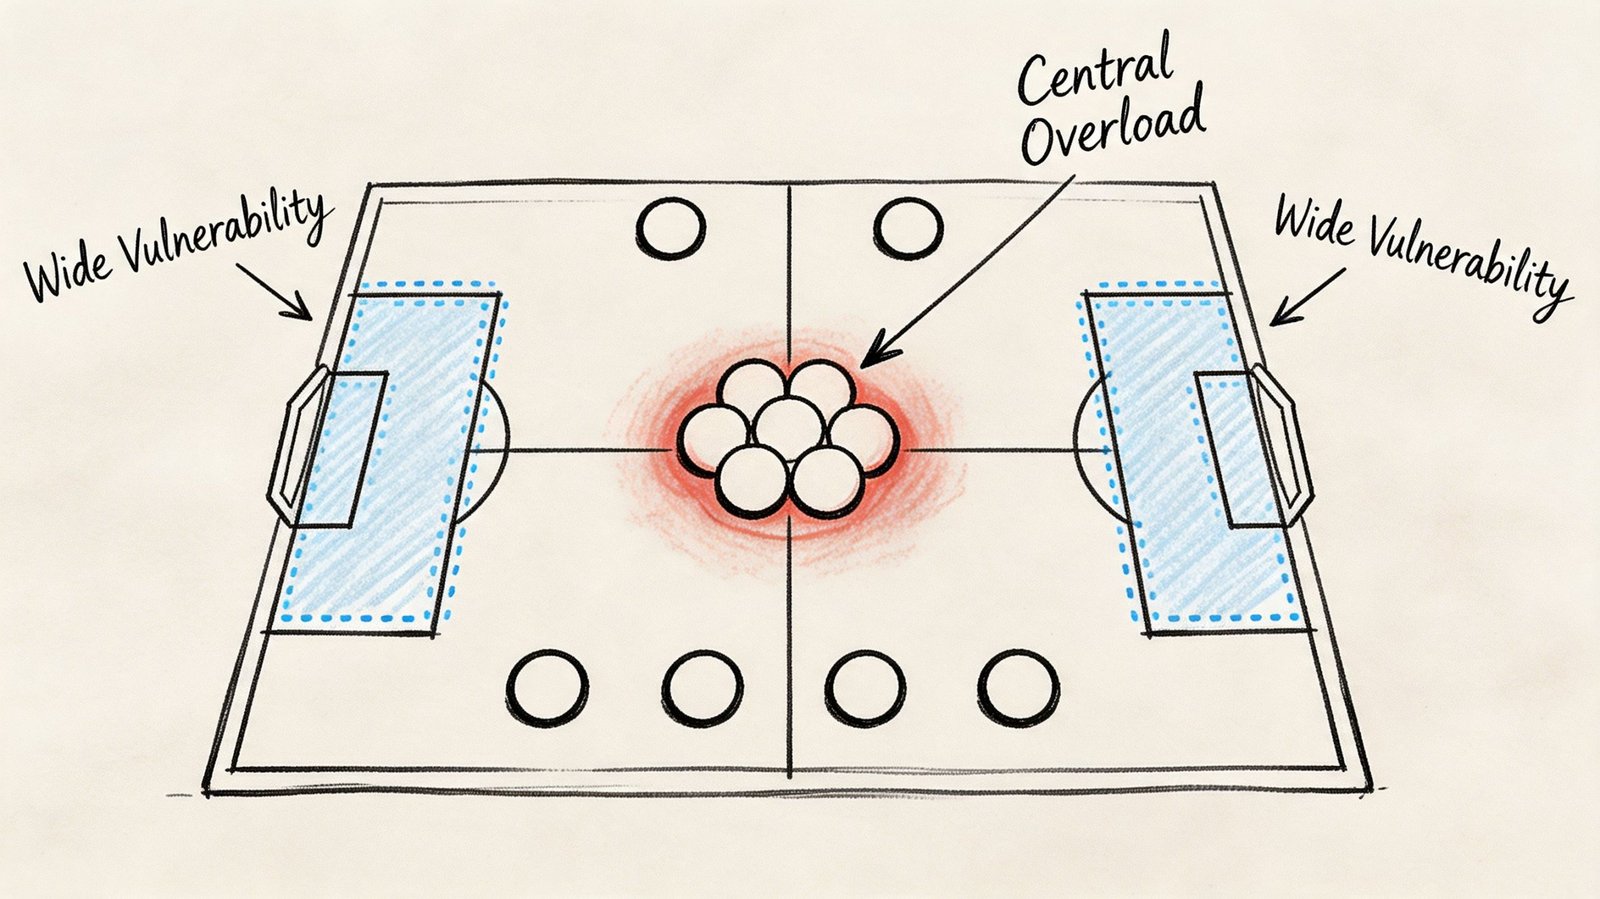
Why the diamond controls the middle
Tactical analysis from Football DNA describes the system’s core advantage clearly: the 4-4-2 diamond formation generates central numerical superiority, often creating a 4v2 or 4v3 overload against common shapes, and that overload produces natural passing triangles that help teams combine quickly and escape pressure (Football DNA’s formation analysis of the 4-4-2 diamond).
That superiority matters in three different moments.
First, it improves ball retention. When the ball enters midfield, the receiving player usually has at least two nearby angles rather than one. That shrinks the risk of dead-end possession. A flat midfield can pass safely. A diamond can pass forward safely because its support is layered.
Second, it improves press resistance. Against a side pressing with a midfield three, the extra central player gives the ball carrier an interior exit. Presses become harder to lock because the team in possession can circulate one touch around the pressure and find the free point of the diamond.
Third, it improves central progression. This is the most important effect. Many teams can keep the ball. Fewer can move it through the middle without resorting to hopeful vertical passes. The diamond creates short interior triangles, which means progression can happen through combinations rather than isolated dribbles.
Two strikers add another layer to that advantage.
- They pin both centre-backs: Opponents can’t step freely into midfield.
- They create immediate depth: One pass can turn central control into a chance to attack space.
- They support second balls: Knockdowns and rebounds often fall in crowded central zones where the diamond already has numbers.
Where the system can be hurt
Every gain comes with a concession. The diamond owns the middle by narrowing the team, and that means the flanks are vulnerable by design.
The lack of natural width creates two recurring defensive problems. The first is the switch of play. If the opposition can draw the diamond toward one side and then move the ball quickly to the far side, the recovering distances become uncomfortable. The second is the wide overload. A winger and full-back against one defending full-back can force emergency help from the near-side eight, which then opens the half-space behind him.
Football DNA also stresses the price of that setup: full-backs need the stamina to defend width and provide attacking overlap, and the structure becomes exposed if rotations fail. That’s the core issue. Not width alone, but width plus mistimed support.
A coach should be honest about the personnel cost. The system asks for:
- A disciplined six: He must screen counters without getting dragged toward the ball.
- Two intelligent eights: They must read when to jump wide and when to stay connected centrally.
- Full-backs with range: They defend long distances and attack them too.
- Forwards willing to work back into shape: Without that, the team stretches too easily.
If the diamond loses compactness for even one transition, the opponent usually finds the side of it, not the middle of it.
That’s why the 4 4 2 diamond formation is best understood as a coach’s trade. You accept stress on the outside in exchange for control inside. If your players can manage the distances, it’s a powerful bargain. If they can’t, the same shape that creates control can create chaos.
Tactics in Possession and Building Attacks
In possession, the diamond doesn’t look narrow for long. The ball moves, players rotate, and the shape starts to tilt from a static diagram into a chain of coordinated relationships.
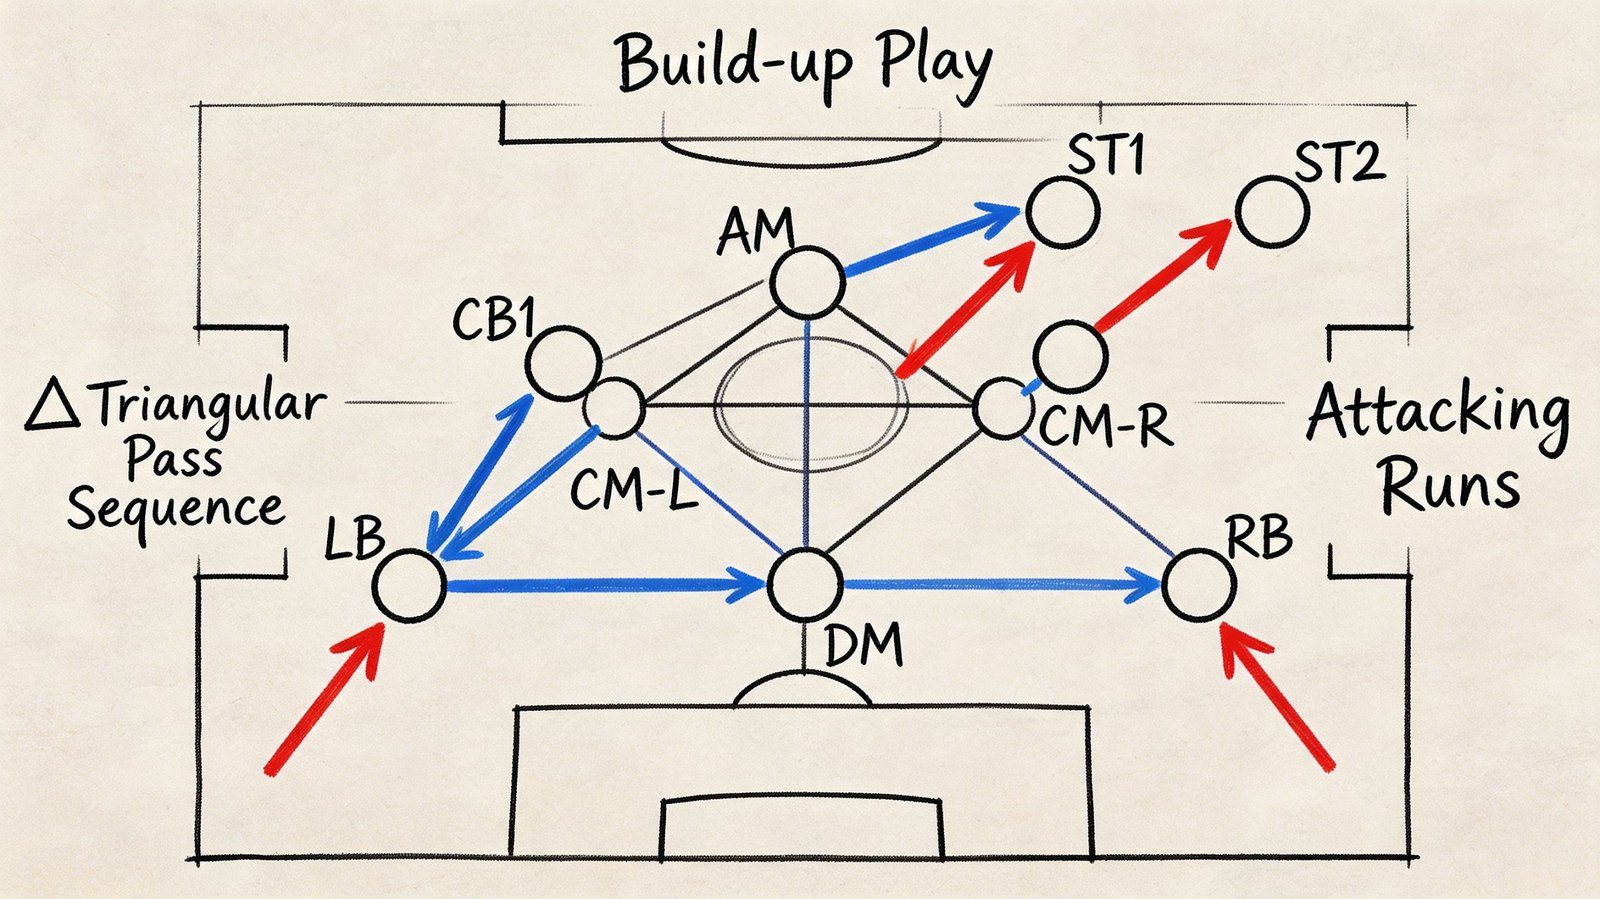
The first progression through the pivot
A typical attack begins with the centre-backs circulating until the number 6 receives facing forward or half-turned. That body shape is everything. If the six receives square, the attack stalls and the opposition can lock the next pass. If he receives on the half-turn, he can play into the near eight, the ten between lines, or the dropping striker.
The best diamond build-up often uses the same sequence. Centre-back into six. Six into an eight. Eight around the corner into the ten or a striker checking short. Then the shape breaks open because defenders have to make decisions on the move.
One reason modern coaches still revisit these relationships is that they solve pressure without overcomplicating the team’s spacing. You can see why debates around elite positional play often return to role clarity, timing, and adaptation, themes that also sit behind Guardiola’s tactical tinkering and its effects on team balance.
A few coaching cues matter here:
- Receive side-on: The six and eights should open their hips before the ball arrives.
- Don’t stand on the same vertical line: If the ten and dropping striker occupy one lane, the pass becomes easier to block.
- Use the third man: The safest forward pass is often the second pass, not the first.
How width appears from a narrow structure
The diamond doesn’t ignore width. It creates width late.
That’s the detail many people miss. In a 4-3-3, width is usually visible from the start because wingers hold the touchline. In a diamond, width often appears after the midfield has already pulled opponents inward. The full-back becomes dangerous because the central unit has attracted pressure first.
One common pattern works like this. The left eight receives inside and draws the opposing midfielder. The left striker drifts toward the channel, taking a defender’s attention with him. That movement opens the lane for the left-back to overlap. Once the ball reaches the full-back, the box is already occupied by two strikers, the ten arriving at the edge, and the far eight attacking the weak-side space.
Coaching cue: Don’t ask the full-back to provide width all the time. Ask him to arrive when the opponent’s wide defender has already narrowed.
The video below shows how those interlocking movements can turn a narrow base into layered attack patterns.
The front two also give the system variety in the final third.
| Striker movement | What it triggers |
|---|---|
| One drops short | A centre-back may step out, opening depth behind |
| One runs the channel | The full-back gets a clearer wide lane to cross |
| Both stay high | The back line gets pinned, leaving room for the ten |
| One drifts wide | The near-side eight can attack the half-space vacated inside |
The smartest diamond attacks don’t force width early. They use central density to earn it.
Defensive Organization and Managing Transitions
A diamond that only attacks won’t last. The shape has to defend in connected layers, or the same central concentration that helps in possession will leave huge recovery sprints after every turnover.

Pressing with the front three shape
The first defensive picture isn’t really a front two. It’s often a front three shape formed by the two strikers and the ten. That triangle can shut central access if the distances are right.
The strikers usually work from outside to in, shaping the opponent’s build-up toward one side. The ten’s role is subtle but decisive. He doesn’t just chase the ball. He protects the pass into the opposition pivot and becomes the connector between the first line and the midfield diamond behind him. If he arrives late, the press becomes a loose pair of forwards. If he arrives on time, the team can trap.
The best pressing triggers in this structure are practical and visible:
- A pass into a full-back facing his own goal
- A poor first touch in central build-up
- A backward pass that slows the tempo
- A square ball that lets the near striker jump and curve the run
The point isn’t to press everywhere. It’s to press where the diamond can lock the centre and force play toward the touchline.
Recovering into a compact block
If the first press is beaten, the diamond has to collapse quickly. At this stage, many coaches underestimate the number 8s. They aren’t just midfield links. They are the players who stop the formation from becoming too narrow to survive.
When the team drops, the shape can resemble two compact banks of four, with the eights shuttling wider and the ten and one striker helping close central lanes. That compactness is one reason the structure has often been hard to break down in lower blocks. The middle stays protected, and opponents are tempted into wider circulation or crosses from less dangerous zones.
The hardest moment is the split second after losing the ball.
- The six protects the central lane first
- The nearest eight jumps to slow the ball-side side
- The far eight tucks in before releasing outward
- The full-backs judge whether to step or delay
- The forwards recover enough to block the easy return pass inside
Win the first duel if you can. If you can’t, win the first second by delaying the next pass.
Counter-attacking from the diamond is often cleaner than people expect. Because the team already has several players close to the regain zone, it can go vertical quickly. A regain by the six can find the ten immediately. A regain by an eight can release a striker running away from a centre-back. The shape’s narrowness becomes useful again because the first pass after recovery often has a short central option.
That’s the deeper defensive value of the system. It doesn’t just survive transitions. If coached well, it turns them into the next attack.
Coaching the Diamond Drills and Progressions
You can’t coach the diamond by placing cones in a rhombus and asking players to “understand the shape.” The behaviour has to be trained in pieces, then stitched together. Session design matters because the system relies on timing, support angles, and coordinated movement more than almost any static lineup card suggests.
For coaches who like to map those details before going to the grass, tactical board work can help frame the relationships. These insights for soccer coaches are useful because they focus on how visual planning tools can make role clarity easier for players to absorb.
Rondo for central connections
Objective: Train the six, eights, and ten to receive under pressure and find the next pass without flattening the shape.
Setup: Use a central square with four outside support players and two or three defenders inside. Place the six at the base, two eights on diagonal lines, and the ten at the top. Rotate the front players into the exercise so the players learn bounce passes into the next line.
Coaching points
- Check shoulders early: The receiving player must scan before movement, not after the first touch.
- Maintain vertical separation: If the eights drift onto one line with the six or ten, the rondo loses its diamond logic.
- Reward third-man actions: The cleanest exits usually come through the player not directly involved in the first pass.
Pattern play for full-back timing
Run this unopposed first, then add passive defenders.
Start with centre-back into six, six into near eight, eight into dropping striker, striker lays off to ten, and the full-back overlaps outside the entire action. Finish with a cut-back or cross. Repeat on both sides, then add the far-side eight arriving late into the box.
The key isn’t speed at first. It’s coordination. The full-back should move when the interior player has drawn the opponent inward, not solely because the ball has entered that side.
Ask the full-back to read the body shape of the eight. If the eight can turn infield, the overlap can wait. If the eight is closed, the overlap becomes the release valve.
Transition game for shuttling eights
Objective: Teach the eights to protect the side channels without abandoning central compactness.
Setup: Use a narrow pitch with marked wide lanes. Play a small-sided game where attacks must involve the central zone before they can release wide. That condition forces the defending diamond to stay compact first, then react outward.
What to coach
- The near-side eight’s first movement should be diagonal, not straight wide.
- The far-side eight should tuck in before he expands.
- The six must hold the middle instead of chasing the first lateral pass.
This drill is valuable because it reproduces the exact tension the shape lives with. Protect the centre, but don’t surrender the flank.
Phase play for complete team behaviour
Finish with an eleven-v-eleven or reduced phase-play exercise focused on one game model. For example, build from the back against a 4-3-3 press, or defend transitions after a full-back overlap.
Use stoppages selectively. Freeze when the distances between the six, near eight, and full-back become too large. Restart if both strikers occupy the same lane. Let players solve the picture after one cue, rather than layering instructions on every rep.
A practical progression is:
- Unopposed patterning
- Directional practice with passive pressure
- Conditioned game with transition rules
- Full phase play with coaching on triggers and spacing
That sequence teaches players what the diamond looks like, then what it feels like under stress. The second part is the one that transfers to matches.
Modern Interpretations and Tactical Counters
Why modern coaches still return to it
The diamond keeps resurfacing because it offers a clear answer to a modern problem. Opponents often dominate matches through central access, whether from a 4-3-3, a 4-2-3-1, or a fluid possession structure that floods midfield. The diamond answers by matching or exceeding those numbers inside without sacrificing a front pair.
That’s why the system has remained attractive to high-level coaches in different eras. As noted earlier in the article, tactical analysis has linked the shape’s central overload and transition value to teams coached by figures such as Jurgen Klopp, Graham Potter, and Massimiliano Allegri. The common thread isn’t ideology. It’s utility. The shape gives a coach a compact centre, two forwards, and enough built-in flexibility to morph through rotations.
In practice, modern interpretations usually soften the old rigidity.
- One striker may drop like a false nine.
- A full-back may invert instead of overlap.
- One eight may advance while the other balances.
- The team may resemble a 3-5-2 or 4-2-2-2 during attacking phases.
The modern version isn’t a museum piece. It’s a framework for manipulating central space.
How to play against the diamond
If you’re facing the 4 4 2 diamond formation, the route to hurting it is usually visible from kickoff. Stretch it horizontally, force its eights into repeated wide recoveries, and move the ball before the shape can re-compact.
A 4-3-3 is a natural counter because the wingers can hold the width that the diamond lacks. A 3-4-3 can do the same while pinning the full-backs with wing-backs and wide forwards. The objective is not just to reach the flank. It’s to shift the diamond far enough that the next pass attacks the gap it leaves behind.
The sequence is often more important than the formation itself:
- Circulate across the back quickly
- Draw one eight out toward the touchline
- Play through or around the full-back
- Attack the half-space that opens behind the shuttle
- Arrive with numbers from the far side
That logic sits behind many analyses of how top sides have been stretched when their compactness breaks. For a wider example of how elite teams can target defensive weak points through circulation and timing, this tactical breakdown of Liverpool exploiting defensive vulnerabilities is a useful companion read.
Against the diamond, don’t confuse possession on the wing with real progress. The damage comes when the ball reaches the side and then returns inside behind the recovering midfield.
The best counter to the diamond isn’t just “use wingers.” It’s use width to deform the shape, then attack the spaces created by that deformation.
Conclusion The Enduring Relevance of the Diamond
The diamond endures because it forces football back to first principles. Control the centre. Create clean support angles. Protect the most dangerous zones. Accept that every advantage creates a vulnerability somewhere else.
That’s why the 4 4 2 diamond formation still matters. It isn’t the right answer for every squad, and it definitely isn’t forgiving. You need a six who reads danger early, eights who can run and think at the same time, a ten who thrives in traffic, and full-backs who understand timing as much as speed. But when those parts fit, the shape gives a team a strong identity very quickly.
For coaches, it’s a training ground test of spacing and role clarity. For analysts, it’s one of the best examples of how a formation expresses trade-offs rather than fixed positions. For serious fans, it sharpens the eye. Once you understand the diamond, you start seeing the game as connections, distances, and occupation of space rather than a list of names on a graphic.
That’s why the diamond deserves study even if you’d never use it. It teaches one of football’s oldest lessons in one of its clearest forms. Win the centre, and you usually control the match.
If you enjoy tactical writing that turns complex match structures into clear football ideas, Manchester City Analysis is worth bookmarking. It’s a strong resource for readers who want detailed breakdowns, coaching-style observations, and sharper context around how elite teams shape games.
Authored using Outrank app